

This easy fermented cabbage is tangy, crunchy, and full of live probiotics! It only takes a few ingredients and a few weeks of patience. Try it with a Reuben Sandwich on Sourdough or enjoy it as a topping on a wide variety of dishes!

Would you like to save this recipe?
This fermented cabbage is the perfect topping for sandwiches, burgers, sausages, salads, and even ramen (trust me, it's amazing). Making sauerkraut at home is also cheaper than buying it, and it tastes so much better. Many people even enjoy a spoonful or two a day.
According to Healthline's article 8 Fermented Foods and Drinks to Boost Digestion and Health, eating fermented foods like sauerkraut can boost the number of beneficial bacteria, or probiotics, in your gut. Probiotics may help with digestion and immunity.
Jump to:
🔖 Ingredients & Substitutions
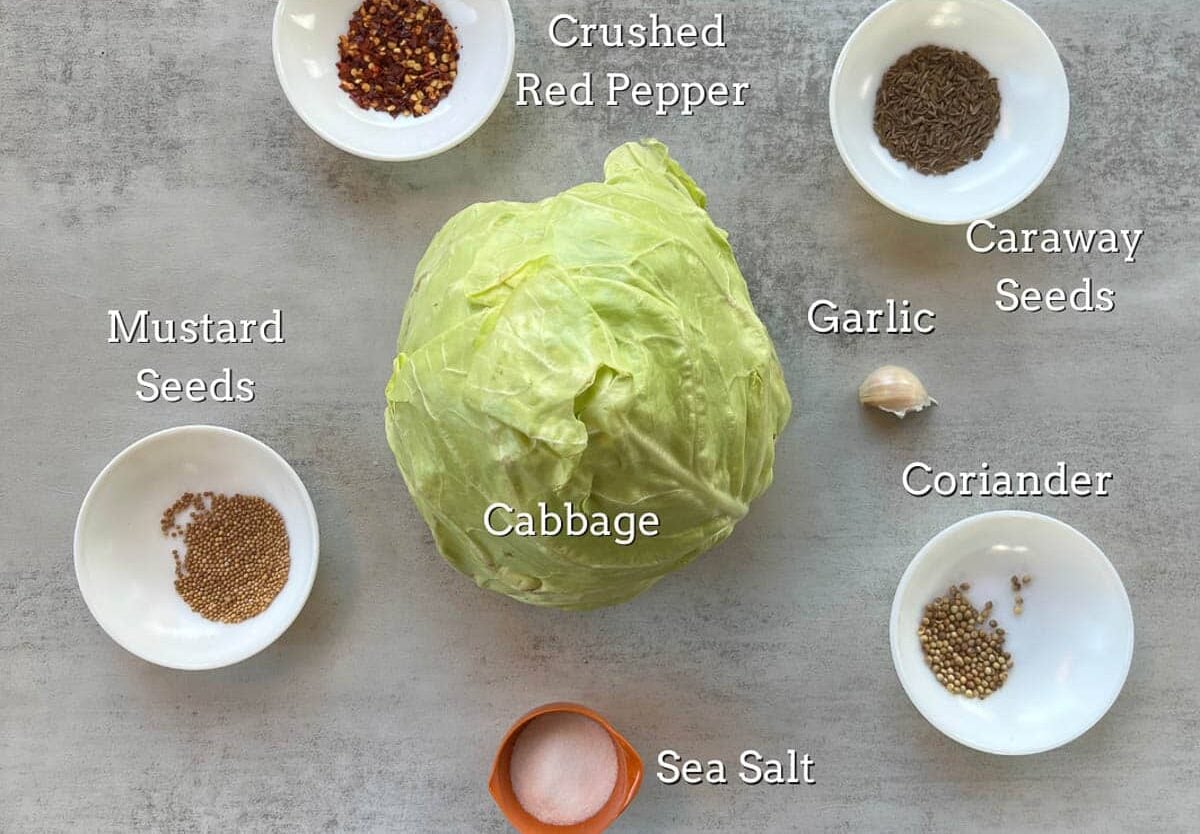
- Cabbage: I used green cabbage, but you can also make red cabbage sauerkraut with red cabbage.
- Brine: Water and sea salt. Use a non-iodized salt like sea salt, kosher salt, or pickling salt.
- Spices: Mustard seeds, coriander, caraway seeds, and crushed red pepper. You could substitute the crushed red pepper with a Serrano pepper or other fresh peppers, or leave it out entirely!
- Garlic: I love the flavor that garlic imparts to fermented cabbage. If you're not a fan, you can leave it out.
- Optional Ingredients: You can also add juniper berries, shredded carrots, and dill seed.
🥬 How To Make Fermented Cabbage
Step 1: Remove the outer leaves of the cabbage, then wash thoroughly. Next, chop the cabbage with a sharp knife and add it to a large non-metallic bowl. Add slivered garlic, spices, and 1 tablespoon of salt. Stir to combine.


Step 2: Let the cabbage sit for at least 15 minutes, then stir once more.

Pro Tip: Most fermented cabbage recipes recommend smashing the cabbage and allowing it to release its juices anywhere from 1 to 2 hours before bottling it. I've tried it both ways and found that the end result is the same.
Step 3: Pack the shredded cabbage mix into 2 sterilized, wide-mouthed 1-quart mason jars (or 4 half-pint jars) using a rubber spatula or non-metallic spoon.


Step 4: Combine 3 cups of water and the remaining 1 tablespoon of salt and stir to dissolve. Pour over the cabbage until it reaches the rim of the jar. Loosely cap the jar with a sterilized lid.


Step 5: The cabbage will begin to bubble as it ferments, so place jars on a rimmed tray or glass dish to catch the juices. Store somewhere cool (between 65 and 72 degrees F).

Pro Tip: If you have an airlock, you can use it to keep impurities out while allowing the air bubbles to escape. You can buy fermenting lids with the airlocks; however, they are not absolutely necessary!

Step 6: Every few days, look inside the jar to see if the water level has fallen below the rim. If so, top it off with more salt water, using 1 ½ teaspoon of salt for every cup of water. If the cabbage is floating to the surface, push it back down until the cabbage is submerged.


Pro Tip: If you have fermenting glass weights, they do a great job of keeping the cabbage submerged in the brine during the fermentation process. This will eliminate mold forming on the cabbage that's being exposed to oxygen.
Step 7: You can ferment your sauerkraut for 1 to 3 weeks, tasting it every few days, until the desired flavor and texture are achieved.

✅ How to Tell When It's Ready
Fermented cabbage becomes ready faster in a warm kitchen and slower in a cool one, so let your taste buds be the judge. Here's what to look for:
- Smell: It smells pleasantly sour and tangy, like sauerkraut, not like raw cabbage.
- Color: The cabbage turns from bright green to a paler, slightly see-through yellow-green.
- Texture: It's softer than raw cabbage but still has a little crunch.
- Bubbles: The bubbling slows down once most of the fermenting is done.
🍽 Serving Suggestions
Homemade sauerkraut is so much tastier than the bagged or canned kraut you can buy in stores. Add it to hot dogs or brats, or make a delicious Reuben sandwich with some smoked corned beef brisket, Swiss cheese, and fermented cabbage.
One of my favorite ways to use fermented sauerkraut is to make kielbasa and sauerkraut. Keep in mind that cooking it kills the live probiotics, so enjoy some raw, too!

🧊 How to Store Fermented Cabbage
Once your fermented cabbage tastes the way you like it, tighten the lid and move the jars to the refrigerator. The cold slows the fermentation way down, so the flavor stays where you want it. Stored in the fridge, it keeps for several months as long as the cabbage stays under the brine. Always use a clean fork or spoon to take some out.
🔍 Is It Mold or Kahm Yeast?
Don't panic if you see something on top of the brine. Here's how to tell the difference:
- Kahm yeast: A thin, flat, white or cream-colored film on the surface of the brine. It may look a little wrinkly. It's harmless, but it can affect the flavor, so skim it off and make sure the cabbage is still submerged.
- Mold: Fuzzy, raised spots that are often blue, green, black, or pink. If you see fuzzy mold, or the cabbage smells rotten or feels slimy, toss the batch to be safe.
The best way to prevent both is to keep the cabbage completely under the brine, which is why fermenting weights are so helpful.
🤷🏻♀️ Recipe FAQs
Fermented cabbage is usually called sauerkraut, which means "sour cabbage." However, there are many kinds of fermented cabbage known by many names across cultures including Korean kimchi, Haitian pikliz, and Vietnamese dua cai chua.
Fermenting cabbage takes at least one week, but it becomes more flavorful the longer it ferments. You can leave your cabbage to ferment for up to 6 weeks, although for many people 3 weeks seems to be the sweet spot.
Yes! Raw, unpasteurized fermented cabbage like this homemade version is full of live probiotics. Most shelf-stable canned or jarred sauerkraut from the store has been pasteurized or heat-processed, which kills the live bacteria. For the most probiotics, eat it raw rather than cooked.
🥒 Other Fermented & Pickled Recipes
- Jerusalem Artichoke Recipe
- Mexican Pickled Carrots
- Pink Onions
- Torshi (Assyrian Pickled Vegetables)
- Quick Pickled Red Cabbage

👩🏼🍳 Pro Tips
- Don't use metallic utensils or bowls when making fermented cabbage. The metal reacts with the acid from the cabbage, causing your sauerkraut to taste like metal.
- No fermenting weights? Set aside a clean cabbage leaf when you start and press it on top of the shredded cabbage to keep it under the brine.
- Cloudy brine and bubbles are a good sign. They mean the fermentation is working.
- Keep the jars out of direct sunlight, and write the start date on each jar so you know when to start tasting.
🌶 More Fermented Recipes



Did you make this recipe?
📖 Recipe
Would you like to save this recipe?

Ingredients
Equipment
Method
- Remove the outer leaves of the cabbage, then wash thoroughly. Next, chop the cabbage with a sharp knife and add it to a large non-metallic bowl. Add slivered garlic, spices, and 1 tablespoon of salt. Stir to combine.
- Let the cabbage sit for at least 15 minutes, then stir once more.
- Pack the shredded cabbage mix into 2 sterilized, wide-mouthed 1-quart mason jars (or 4 half-pint jars) using a rubber spatula or non-metallic spoon.
- Combine 3 cups of water with the remaining 1 tablespoon of salt and stir to dissolve. Pour over the cabbage until it reaches the rim of the jar. Loosely cap the jar with a sterilized lid.
- The cabbage will begin to bubble as it ferments, so place jars on a rimmed tray or glass dish to catch the juices. Store somewhere cool (between 65 and 72 degrees F).
- Every few days, look inside the jar to see if the water level has fallen below the rim. If so, top it off with more salt water, using 1 ½ teaspoons of salt for every cup of water. If the cabbage is floating to the surface, push it back down until the cabbage is submerged.
- You can ferment your sauerkraut for 1 to 3 weeks, tasting it every few days, until the desired flavor and texture is achieved.
Nutrition
Video
Notes
- Most fermented cabbage recipes recommend smashing the cabbage and allowing it to release its juices for 1-2 hours before bottling, but I've tried it both ways, and the end result is the same.
- If you have fermenting glass weights, use them. They do an excellent job of keeping the cabbage submerged in the liquid and not exposed to oxygen as it ferments.
- If you have an airlock, you can use it to keep impurities out while allowing the air bubbles to escape. You can buy fermenting lids with airlocks, however, they are not absolutely necessary!
- Don't use metallic utensils or bowls when making fermented cabbage. The metal reacts with the acid from the cabbage, causing your sauerkraut to taste like metal.
- If you don't own fermenting weights, set aside a cabbage leaf when you first start. Once the shredded cabbage is bottled, place the reserved cabbage leaf on top to keep the cabbage from floating to the surface.
- You can use this recipe to make red cabbage sauerkraut by swapping purple cabbage for the green cabbage.
Debby Chiang says
How do you stop the fermenting process once the desired flavor is achieved?
Hilda Sterner says
Hi Debby, When you are satisfied with the flavor, simply refrigerate it to stop the fermentation.
Sara says
I’m going to try making this for the first time today and was just wondering if I added one pay leaf if it would help keep the sauerkraut a little crunchy
Hilda Sterner says
Hi Sara, I have read that adding a bay leaf can help with the crunch but I honestly haven't tried it because I didn't want to alter the flavor. You can also try reducing the salt by 1 teaspoon and the temp of the room where it's fermenting is not too hot, around 70F. I hope that helps, good luck!
Gunita Singh says
When do you put the fermented cabbage in the fridge? Do you just leave it out for 1-3 weeks? Please let me know as my cabbage has already been out for 1 week. Thanks for the recipe 🙂
Gunita Singh says
Do you keep this out for a week to ferment and then put it in the fridge?
Hilda Sterner says
Hi Gunita, Yes, as it states in the last step of the recipe "You can ferment your sauerkraut for 1 to 3 weeks, tasting it every few days, until the desired flavor and texture are achieved." So once your desired flavor is achieved, you'd store it in the fridge.
Gunita Singh says
Thank you so much! I'm sorry I did not see that you replyed to my comment earlier. I'm excited to try this!
Hilda Sterner says
You're welcome! 🙂